When creating a warm and comfortable home environment, water underfloor heating is one of the most efficient and discreet heating methods available. It provides consistent warmth from the ground up, is energy-efficient, and eliminates the need for unsightly radiators. This comprehensive guide will teach you everything you need to know about “How to Install Water Underfloor Heating?”
What is Water Underfloor Heating?
Water underfloor heating, also known as a wet or hydronic system, is a method of central heating that uses the floors of your property as a giant radiator. It achieves this by circulating warm water through a series of continuous loops fitted underneath your floor, providing an even and consistent heat source.
Benefits of Water Underfloor Heating
Water underfloor heating systems offer several advantages that make them increasingly popular amongst homeowners and businesses alike:
- Energy Efficiency: They are more energy-efficient than traditional radiators, resulting in lower heating bills.
- Space-Saving: They are entirely hidden beneath your floors, freeing up wall space that would typically be occupied by radiators.
- Comfort: They provide more uniform heat across your entire room, eliminating cold spots and creating a comfortable environment.
- Health: They reduce the circulation of dust and allergens, making them a healthier option for those with allergies.
- Design Freedom: Their hidden nature allows for more design freedom without incorporating radiators into your room layout.
Types of Water Underfloor Heating Systems
There are two primary types of water underfloor heating systems:
- Screed Systems: These are most commonly used in new builds or extensions, where the pipework is laid onto insulation before being covered with a screed to provide a thermal mass for the heating system.
- Low Profile Systems: These are ideal for renovation projects as they require less floor height. They work by fitting the heating pipes into pre-formed panels or boards on top of the existing floor.
Understanding how to install water underfloor heating involves knowing the system you’re dealing with. Both systems have their own pros and cons, and the best one for you will depend on your particular needs and circumstances.
How do Water Underfloor Heating Systems Work?
Water underfloor heating, also known as hydronic underfloor heating, operates by circulating warm water through a network of pipes embedded beneath your floor. These pipes create radiant heat that rises evenly across the entire floor surface, resulting in a consistent, comfortable temperature in the room.
The warm water used in underfloor heating systems is typically supplied by your home’s main heating system, such as a boiler or a heat pump. The water is circulated through the pipes using a series of pumps and valves, which are controlled by thermostats to ensure the system maintains the desired temperature.
What Temperature Does Water Underfloor Heating Need to Be?
The temperature of the water in underfloor heating systems generally ranges from 40 to 60 degrees Celsius, depending on the system and the type of floor covering used. This is significantly lower than the water temperature in traditional radiator systems, which usually operate at around 70 to 80 degrees Celsius, making underfloor heating more energy-efficient.
To get the most out of your underfloor heating system, it’s essential to ensure that the temperature is regulated correctly. Too hot could be inefficient and uncomfortable, and too cold may not provide enough heat to warm the room adequately.
Where can Water Underfloor Heating be Installed?
Water underfloor heating can be installed in virtually any room in a house, including living rooms, kitchens, bathrooms, and bedrooms. It’s particularly popular in rooms with hard flooring, such as tile or stone, as these materials conduct heat well.
One of the key considerations when deciding where to install underfloor heating is insulation. Good insulation reduces heat loss, making the system more efficient. This is particularly important in older homes, which may not be as well insulated as newer buildings.
How do you Install Water Underfloor Heating?
Before we proceed with the installation process, it’s crucial to note that while it’s possible to DIY, professional installation is highly recommended due to the complex nature of the process and the potential for costly errors. This is where BuildPro comes into the picture with its expert installation services.
Nonetheless, to give you a clear understanding of the process, let’s look at the steps involved in installing a water underfloor heating system.
Planning Your Water Underfloor Heating System
The first step in any project is planning. This involves calculating the heat requirement of the room (measured in watts), which depends on factors such as the size of the room, the level of insulation, and the type of floor covering. You’ll also need to decide on the pipe spacing, which affects the heat output – the closer the pipes, the higher the heat output.
Additionally, you’ll need to plan the layout of the pipes, ensuring they can be connected to the manifold (the control centre of the heating system) in a way that allows the hot water to flow evenly through each pipe.
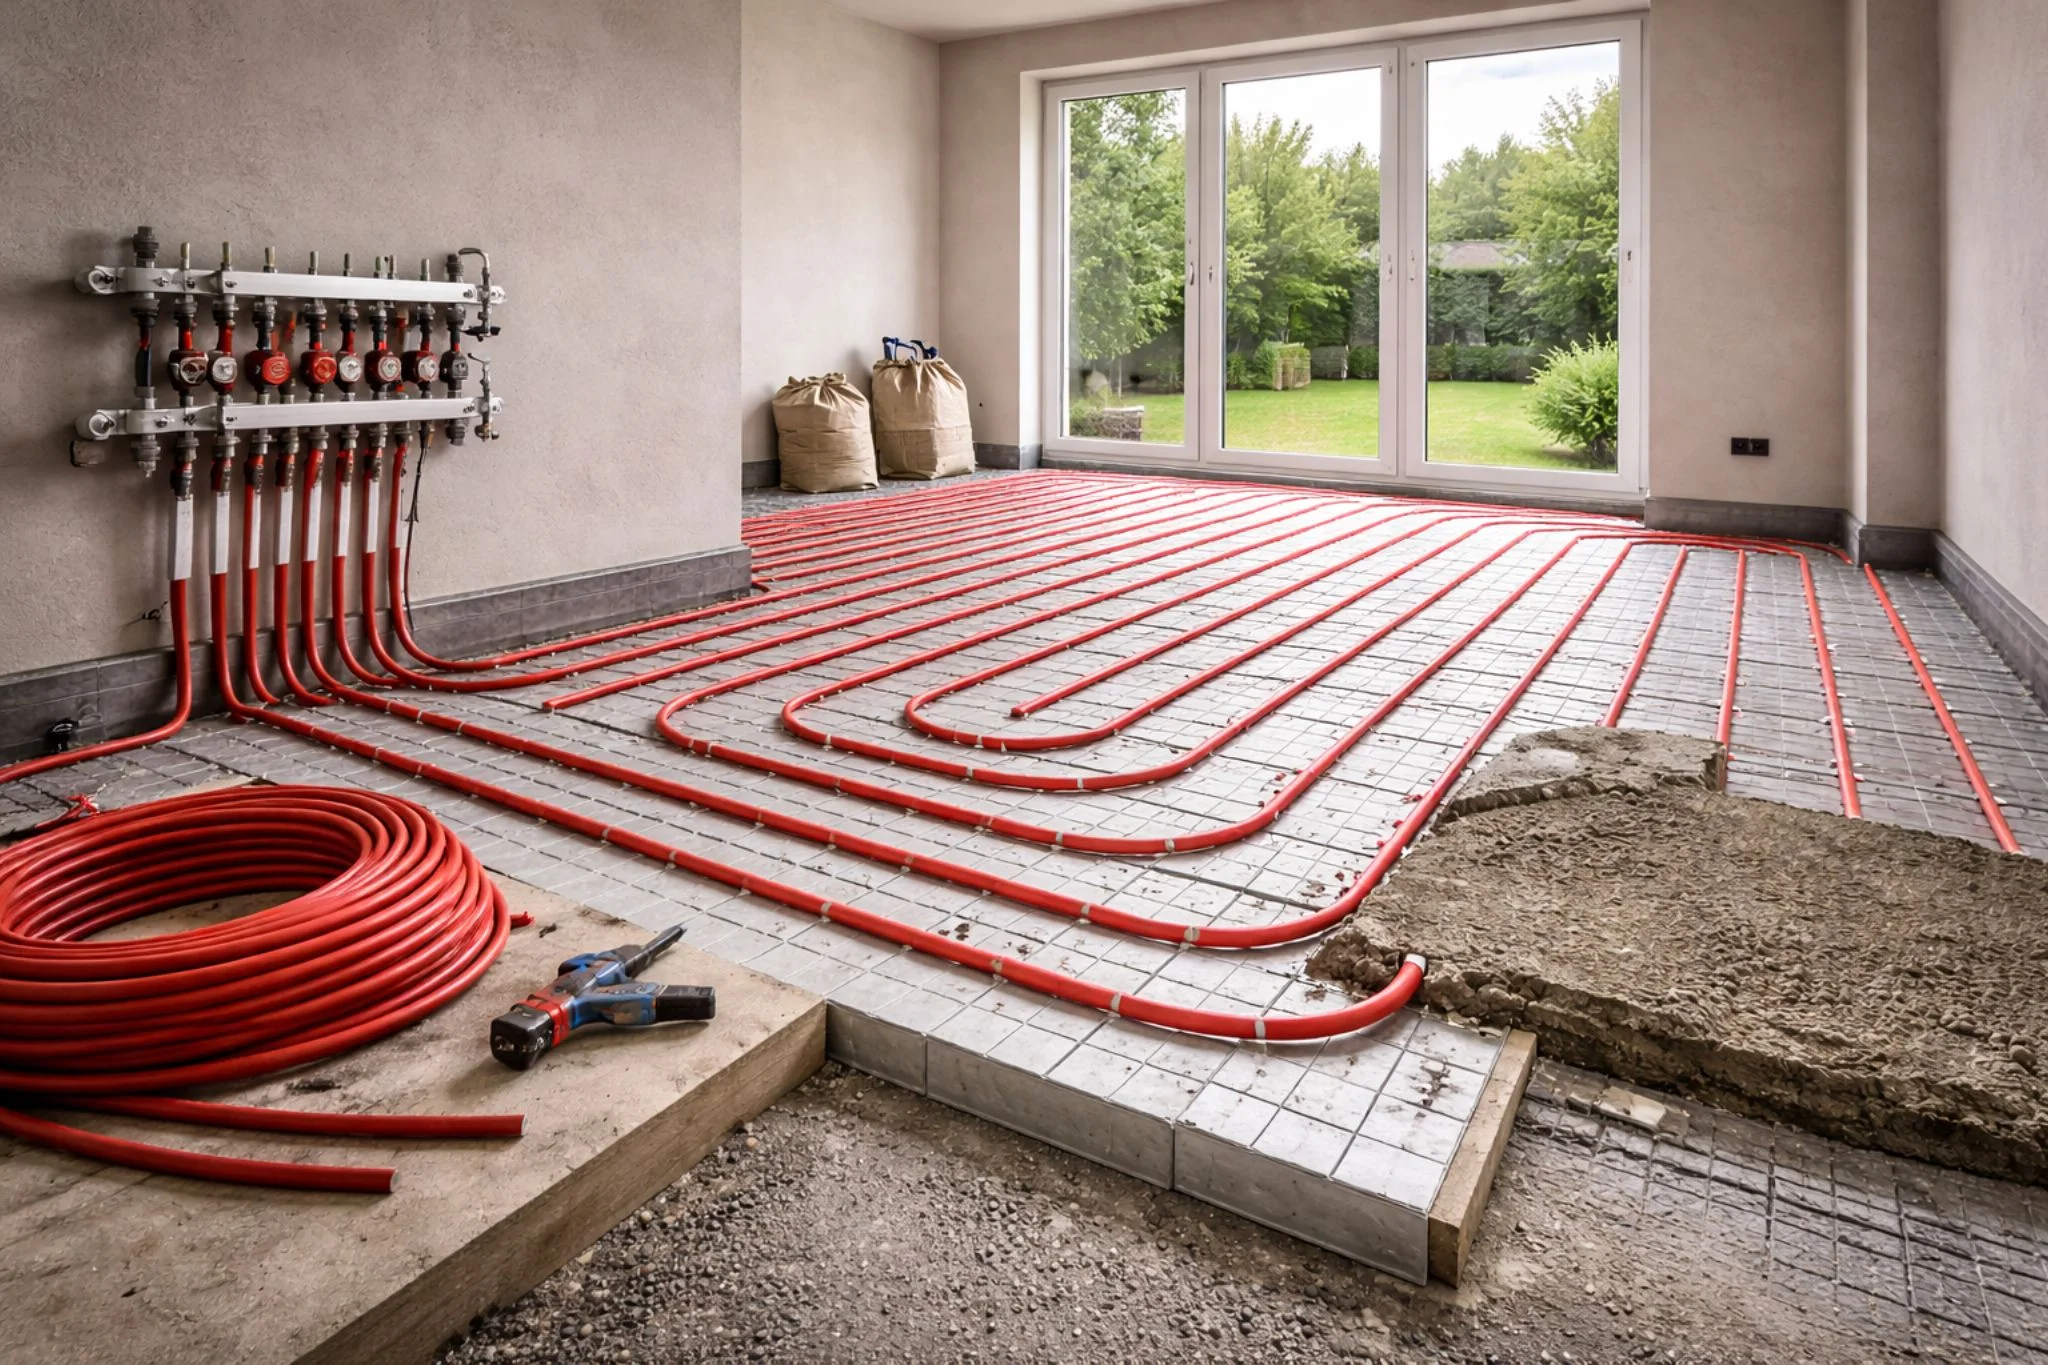
Installing the Manifold
The manifold is where the hot water from your heat source enters the underfloor heating system. It controls the flow of water through the pipes, ensuring that each pipe receives hot water at the correct temperature.
The manifold should be installed at a central location, typically in a utility room or cupboard, where it can be easily accessed for maintenance. It should be installed at a height that allows easy connection to the pipes and the heat source.
Laying the Insulation
Before the pipes are laid, insulation should be installed to prevent heat loss downward and maximise heat output upward into the room. The insulation is typically made of foam and should be laid on a clean, level subfloor.
Laying the Pipe
Once the insulation is in place, the pipes can be laid. These should be laid according to the plan created in the first step, ensuring an even spread of heat across the floor. The pipes should be secured to the insulation using pipe staples.
Fixing the Pipes
After the pipes have been laid, they should be fixed securely to ensure they stay in place when the screed is poured. This can be done using pipe clips, which hold the pipes in place on the insulation.
Pressure Testing the System
Before the screed is poured, the system should be pressure tested to ensure there are no leaks in the pipes. This involves filling the system with water, pressurising it, and checking for any drop in pressure over a set period.
Pouring the Screed
Once the pressure test has been passed, the screed can be poured. The screed serves to encase the pipes and spread the heat evenly across the floor. Once poured, it will need to be left to dry thoroughly, which can take several weeks.
Connecting the System to Your Boiler
The pipes should then be connected to the boiler or heat source, filling the system with water. This step should be performed by a qualified professional to ensure safe and efficient operation.
Wiring Up Your Thermostat
The next step is to wire up your thermostat. The thermostat controls the temperature of the water in the system and should be placed in a convenient location. Again, this is a task that a professional electrician should carry out.
Commissioning Your System
After the thermostat is wired up, the system can be commissioned. This involves setting the desired temperature and checking that the system is working correctly. The system may take a few days to reach its optimum temperature.
Maintenance and Troubleshooting
Once installed, water underfloor heating systems require little maintenance. However, regular checks should be performed to ensure the system is working effectively. If you notice any issues, such as uneven heating or a sudden increase in energy bills, it may indicate a problem with the system.
Single Zone vs Multi-Zoned Systems
When installing water underfloor heating, the difference between single-zone and multi-zone systems is worth noting. A single-zone system has one thermostat controlling the temperature for the entire system. In contrast, a multi-zoned system allows different areas or rooms to be controlled independently.
A multi-zoned system can provide more efficient heating and greater control over your home’s temperature, but it’s more complex and costly to install. Discuss with your installer which system is best for your needs.
Contact BuildPro for Expert Underfloor Heating Installation
While this guide provides an overview of how to install water underfloor heating, it’s essential to remember that such a project involves significant work and requires a thorough understanding of both the system and your home’s construction. The experienced team at BuildPro can provide a comprehensive installation service, ensuring your system is installed correctly and efficiently.
Our experts are on hand to advise you on the best system for your needs, help you plan your installation, and carry out the work to the highest standard. If you’re considering a water underfloor heating system, contact BuildPro today for a consultation and quote.


